• About
  • German Version
    • Osterlämmchen
    • Roher Mango-Käsekuchen
    • Vollkornbrezeln
    • Rohe Erdbeertarte
  • Recipes

Playful and hungry

~ Delicious food – a playful approach!

Playful and hungry

Tag Archives: cake

Mandarine Yogurt Cake – Hell yeah it’s summer!

12 Friday Jul 2013

Posted by Playful and Hungry in Playful food and photos

≈ 5 Comments

Tags

cake, cake decoration, cake filling, cooking, dessert, food photography, healthy, lego, muesli, playful, recipes, vegan, vegetarian, vita-mix, yogurt

Wow – it’s been a while since the last post! I promise to improve! ;)

But, well, summer has finally arrived in Germany! And guess what – with summer being here right now, my exam period is starting… what a great timing. Sitting inside and studying while the weather is absolutely awesome is hard for me.

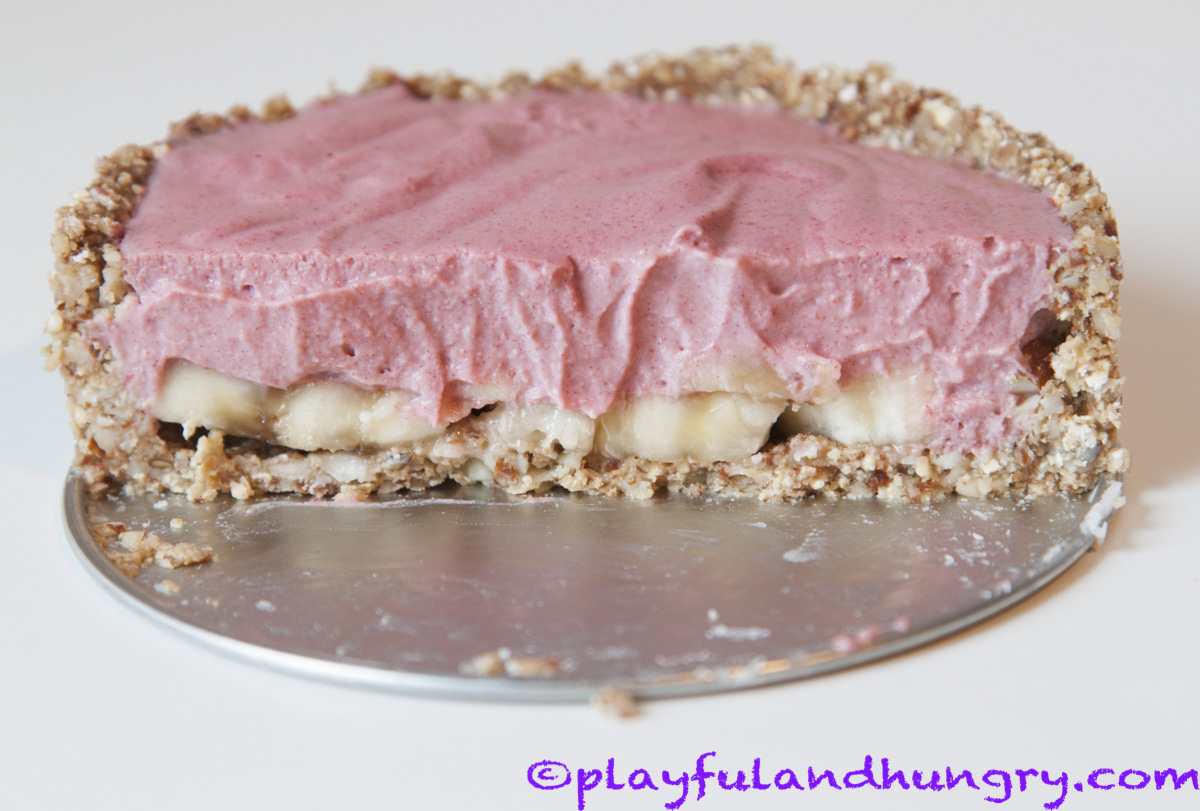
However, this is not about my exams, this is about food! Yummy, delicious, vegan food! And so… there’s nothing better in summer than a no-bake cake. A refreshing, delicious, cool, no bake cake. So, that’s exactly what I made. I remembered the Vanilla-Mandarine-Pudding cake that my grandma used to make when I was still very little. Inspired by that awesome food combination, I thought of a light, cool and vegan summer version of this cake. Here it is.

Mandarinenkuchen_1

Trust me, it is delicious! An unexpected discovery with this cake was the crust, which I just whipped up pretty spontaneously, not knowing that it would taste SO great! I had some left-over dough from the crust and I just formed it into little balls and snacked on them – so yummy!

2013-07-06 Mandarinenkuchen_2

Yogurt-Mandarine Vanilla Cake
Ø about 18cm / 7 inches

For the crust 

  • one cup muesli (just regular muesli, nothing fancy and NO granola)
  • 2 tbsp almond butter
  • 2-4 tbsp agave syrup
  • 2 tbsp flax seed
  • pinch of salt (optional)

For the filling

  • 1 can mandarines (ca. 300g / 10.5 ounces)
  • 650g vanilla soy yogurt
  • 2 packages agartine (german product) OR two tsp agar agar powder

For the crust: Put the muesli, almond butter flax and agave in your blender or food processor. Mix until it sticks together, adding more agave if it’s too dry and more muesli if it’s too sticky. Press the mixture into a round pan lined with baking paper.

For the filling: Pour the can (fruit + juice!) in a pot and stir in agar agar. Bring it to a boil  for about 2 minutes. Pour the vanilla yogurt into a bowl and mix in the mandarine mixture, using a whisk. You want some of the little mandarine segments to separate, that’s what makes the cake great in my opinion. Pour the mixture into the spring pan, let it cool down completely. Store into your refrigerator.

2013-07-06 Mandarinenkuchen_6


“Hey… you forgot to say something!!!”
– Oh, yeah, sure… well, you don’t have to use store bought vanilla yogurt. Actually, it’s quite easy to make your own! Just scratch out the inside of one vanilla bean and add sweetener to taste. You can create a yellow color by either using curcuma or saffron.

2013-07-06 Mandarinenkuchen_4


Thanks for reminding me! ;)

2013-07-06 Mandarinenkuchen_5

RAW Strawberry Cream Dream Pie

10 Friday May 2013

Posted by Playful and Hungry in Playful food and photos

≈ 10 Comments

Tags

almond, banana, cake, dessert, food photography, healthy food, lego, pie, raw, recipes, strawberries, strawberry, tarte, vegan, vegetarian, vita-mix

Click here for German version! / Deutsche Version
Time for another RAW dessert!

After trying to make homemade granola yesterday, I am convinced that I’m  much more gifted at making raw food desserts and meals or baked muffins and cake and… actually anything. Anything that’s not granola.

Everything turned out great – the rhubarb muffins (yummy!), the caramelized green asparagus (double yummy!)… but the granola, the one thing I was most excited about, just didn’t turn out the way I imagined it. So much for granola.

I like muffins and raw desserts better, anyway! ;)

Strawberry Dream Cream Pie_2

There is our beauty. I guess the name says it all…!

I especially like the new kind of dough i tried this time. It’s based on banana instead of dates!

Strawberry Dream Cream Pie_6

Strawberry Cream Dream Pie 
yields about three tartlets 

For the dough:

  • one banana
  • one part oat flour
  • one part ground almonds
  • optional: sliced banana or strawberries
  • optional: pinch of salt

For the cream:

  • about 10 medium sized strawberries
  • 6 tablespoons coconut butter
  • 5-8 dates (depending on your sweet tooth)
  • pinch of vanilla or 1 tsp vanilla extract
  • pinch of salt
  • 1 tbsp lemon juice
  • optional: 1/2 tsp psyllium
  • coconut oil for greasing the pan

For the dough puree the banana in a mixer (or with a hand blender). Stir in oat flour and ground almonds, until you have a smooth dough. Grease three tartlet pans with coconut oil and line the pans with dough. Put in the refrigerator.
For the cream, mix all the ingredients in a high speed blender until smooth. Put sliced banana or strawberries on the dough. Pour the cream into the prepared pans and chill in the refrigerator over night (NO need to freeze!).

You can freeze the tartlets, of course. But you don’t have to! The slice I cut (you see it in the pic above) was beautiful even though the cake was not frozen!

Strawberry Dream Cream Pie_7I did one version with banana slices at the button, one with strawberries and one with cream only. I loved them all.

Strawberry Dream Cream Pie_4My little friend likes the strawberry slices version best. I guess we might get some trouble. He doesn’t know yet that I just don’t share strawberries! They are my favorite fruit!!!

Strawberry Dream Cream Pie_5I actually used two tartlet pans and one miniature spring pan, same size as the tartlet pans. I love small pies, they are so cute! You can have a pie on your own!
Of course, you could also make one big pie or tarte.

Oh, and by the way… that miniature pan is from a toy store. Yup. Toy stores are great. You can buy lego AND miniature kitchen tools! Support your local toy store! ;)

RAW Carrot Cake with Mango-Creamcheese Frosting

13 Saturday Apr 2013

Posted by Playful and Hungry in Playful food and photos

≈ 19 Comments

Tags

cake, cake decoration, carrot, cheesecake, coconut butter, cream cheese, dessert, food, food photography, frosting, healthy food, healty eating, lego, raw, recipes, vegan, vegetarian, vita-mix

The best raw cake I’ve ever tasted.

Raw Vegan Carrot Cake Piece


And I’ve made and tasted quite a few by know.
As they usually consist of dried fruit and nuts, they tend to be quite dense and sometimes, they make you feel kind of heavy.

This one is different. It’s still a raw cake, it’s still not an exact copy of the original (anyway, if I want to taste a baked carrot cake, I’ll just bake one!). But it is not as dense and heavy as most raw cakes out there! It’s easier on the stomach and tastes great – what else could you wish for!

Another thing I love about this cake: The frosting is without cashews. Cashew-free frosting!!! I like cashews, that’s not it. But I like to change up things every once in a while.


 Raw Carrot Cake_3


There you go – the princess is cutting the cake!

RAW Carrot Cake 

For the cake: 

  • 1 large carrot
  • 3/4 cup buckwheat flour
  • 1/2 cup dates
  • 1/2 cup dried pineapple or apricots
  • 1/4 cup coconut shreds
  • 1/2 tsp cinnamon
  • optional: 1/4 teaspoon cardamom
  • optional: dash of ground gloves, nutmeg, allspice and salt

For the frosting: 

  • 1/4 cup coconut butter
  • about 4 big pieces dried mango (of course, the amount depends on the size of your mango pieces. If the flavor is not intense enough, blend in more mango!)
  • 1/8 tsp ground vanilla
  • 1 tsp coconut oil
  • 1 tsp lemon juice
  • water as needed (start with 1/4 cup)
  • optional: dash of salt

For the cake: cut carrots into small chunks. Then throw all ingredients, including the carrots, in your food processor or high speed blender and pulse until it sticks together. Use your hands to for a round cake! You could also use a spring pan or tartlet pans, too. However, I kept it simple and just formed small, round cakes by hand.

For the frosting: Blend all the ingredients in you high speed blender until smooth, adding just enough water to create a smooth and creamy (and delicious!) frosting.

Assembly: That’s totally up to you! You could make a two layer cake, like I did. Put frosting on the first cake base, add the second one and cover the whole cake with frosting. You could also use your icing bag.

Raw carrot cake


“naked” carrot cakes with just a little mango creamcheese icing. Honestly, that icing is divine…

Raw Vegan Carrot Cake

Oh, of course, a princess always gets what she wants. Here’s her piece of the cake!


Bunny Cake

30 Saturday Mar 2013

Posted by Playful and Hungry in Playful food and photos

≈ 5 Comments

Tags

baking, cake, cake decoration, chocolate, cocoa, dessert, Easter, food photography, frosting, healthy food, lego, recipes, seasonal, vegan, vegetarian

A fun last minute idea for Easter. And for people who like bunnies. Or Alice in Wonderland. Or both (me, me, me! ).

Bunny Cake

Actually, it’s really rather a very simple idea. I used my to-go Chocolate Cake recipe with this, cause it never fails and it’s been tested at so many birthday parties… But you could use your favorite recipe just as well.

I’m really in love with this idea. However, I’m not sure whether we’ll ever be able to cut this cake… it’s just too cute!

bunnies


Look, the bunny already made friends at our house…

The “fur” is made from shredded coconut. I used a simple royal icing to make it stick. I guess a cream icing would look better cause it really covers the chocolate cake and you’d have a white base for the coconut, so no brown cake shines through. However… the way I did it, it tasted better. We just don’t like to much heavy and sugary icing on our cake… so this is a good compromise! I just used a thin layer of icing for the bow.

Bunny Cake 

Fail-proof easy chocolate cake (two ø 20cm / 8 inch pans or one bigger pan)

  • 200g (1 1/2 cups) all purpose flour
  • 200g (1 2/3 cups) whole wheat flour
  • 1 package baking powder (about 4 tsp)
  • 45g (4 tbsp) cocoa powder (unsweetened)
  • 250g (1 cup) sugar
  • pinch of salt
  • 200ml (3/4 cup) canola oil
  • 300ml (1 1/4 cup) water

Decoration

  • 125g (1 cup) icing sugar
  • 1 tsp corn starch
  • 3-4 tsp water
  • shredded coconut
  • pink food colors (I used Wilton)
  • blue icing (or any other color, could use this recipe made with blue food color)
  • black icing (again, you can use the recipe liked above or use your favorite one)
  • little pink sugar hearts for the nose (or pink icing)

For the cake: Place all the dry ingredients in a bowl and mix. Add water and oil and stir until combined. Pour into two greased, round baking pans and bake for about 30 min (180 C / 360 F)

Let the cake cool down before you cut it like this:

cut it


Decoration: Mix shredded coconut (just one or two hands!) with pink food colors. If you’re using Wilton gel colors, like I did, add a tiny little bit of water for even coloring). Mix icing sugar, corn starch and water until smooth. Apply this icing to the “face” and “ears”. Decorate the middle of the ears with pink shredded coconut, the face and the rest of the ears with white shredded coconut.

Cover the bow with colored icing of your choice. I used a chocolate button for the middle of the bow.
Use sugar hearts or pink icing as a nose and draw the face with black icing.

That’s it!

Note: You could also use 400g whole wheat or 400 all purpose flour. I tried both, it still works and tastes good! However, the recipe tastes best when you use some whole wheat flour (even if you’re not concerned about it’s health benefits and so on). Cocoa and whole wheat flour yields a really nice and rich flavor!

bunny


Bunny, grinning like a Cheshire Cat ;)

I love it when simple things actually look good. And if you’re a little more skilled and patient than I am (and it’s really nor hard to be more patient then me!) it could look even better!

chicken


But for now: Happy Easter!

Cute Easter Lamb

20 Wednesday Mar 2013

Posted by Playful and Hungry in Playful food and photos

≈ 13 Comments

Tags

baking, cake, chocolate, dessert, Easter, food photography, frosting, lego, playful, recipes, seasonal, vegan, vegetarian, yeast

Today’s the first day of spring! Yay!

However, it’s cold and it’s raining  here… well, that’s just one more reason to do some baking! There’s no sweeter way to heat up the house!

Easter Lamb

My little, chubby Easter lamb.
Baking an Easter lamb used to be a tradition at our house when I was little. We used to have a special pan for the Easter Lamb.
Now I wanted to revive that tradition the vegan way. Without a special pan. If you have very limited shelf space in your kitchen, you think twice before buying another tool, especially those that are used just once a year! No, there had to be another way of baking an Easter Lamb.

Easter

And Easter Eggs. Easter Eggs are so much better when they are made of dough or chocolate!

I used a very traditional combination: Yeast dough, streusel topping and A LOT of sugar icing! I also formed some easter eggs and a little Easter cookie, as I had some dough left. (You could also form one big Easter Lamb… but I usually like to have more and smaller pieces!)

Easter Lamb 

For the lamb:

  • 350g (3 cups) all purpose flour 
  • 50g (1/4 cup) sugar
  • 1 package vanilla sugar OR 1 teaspoon vanilla extract
  • 250 ml (1 cup) room temperatured almond milk (or any other kind of plant based milk)
  • 3 tbsp Oil
  • 1 package active dry yeast
  • 1 pinch of salt
  • soy creamer (for coating)

For the streusel:

  • 75g (2/3 cup) all purpose flour
  • 40g (1/4 cup) sugar
  • 40g (3 tbsp) margarine
  • pinch of salt

Decoration:

  • icing sugar
  • water
  • melted chocolate

For the yeast dough, mix all the dry ingredients. Add milk and oil and either knead with your hands (that’s the way I do it) or with a kitchen machine. Add more milk or flour if needed to create a smooth, non-sticking dough. Shape dough into a bowl, place in a large bowl, cover with a towel and set aside for about 40 min.

When the dough has doubled it’s volume, form little balls (Ø about 3 cm / 1 inch) from about 3/4 of the dough. Brush the balls with soy creamer and form the body by placing them in the desired shape on a baking sheet. From the rest of the dough, form legs and head. Brush with soy creamer and add to the body.

Brush legs and head with soy creamer.

For the streusel: Combine all ingredients with you hands or a kitchen machine. Top the lambs body with a “streusel fur”.

Bake for about 30 – 40 min (360 F / 180 C).

Decorate the cooled lamb with sugar icing and chocolate.

Easter Bunny

Easter lamb and bunny! I do like bunnies. I should bake a bunny, too…

easter bunny

More sweet stuff!

lamb or bunny

This was supposed to be a lamb’s head. Looking at it now… it could also be a bunny, right? Oh well, it’s the inner values (the taste!) that counts, right?

cute lamb

Yummy. It’s just as good as “Streuseltaler” from any German bakery. And it’s cute.

Are there any special easter traditions at your house?
As this was an early Easter Lamb, I guess I’ll have to do another one for Easter…

RAW Mango Cheesecake

05 Tuesday Mar 2013

Posted by Playful and Hungry in Playful food and photos

≈ 12 Comments

Tags

almond, almonds, baking, cake, cake filling, cashews, cheesecake, cream cheese, dessert, food photography, fruit, healthy food, lego, mango, nuts, raw, recipes, vegan, vegetarian, vita-mix

Deutsche Version / German version

Okay, I am kind of proud of this one. I just recently got into raw “baking”. I’m not a raw foodist, as you can see on this blog, but I love play around with raw food preparation! For me, it’s a really creative approach that offers so many new possibilities and new flavors! Some of them are worth sharing…

Like this one.

mango cheesecake

RAW Mango Cheesecake. It does not only look delicious, it really is! Don’t compare raw cakes to baked treats. They are not an imitation – they are different, a whole new thing. See them as an alternative or as a very tasty addition to your diet!
Raw cakes are usually quite rich – you might want to cut smaller pieces than you’d do with a regular cake.

RAW Mango Cheesecake

RAW Mango Cheesecake

 Ø about 20cm / 8 inch

For the crust:

  • 3/4 cup (about 100g) pitted dates
  • about 1/2 -3/4 cup nuts or seeds (I used sesame seeds and almonds)
  • 1/2 tsp cinnamon
  • Pinch of salt

For the filling:

  • 3/4 cup (100g) cashews 
  • 4-5 pieces dried mango (my pieces more rather big, use more if your pieces are rather small)
  • 4 tbsp coconut butter
  • 1/2 cup (about 50g) xylit (or sweetener to taste)
  • 1/4 tsp powdered vanilla
  • pinch of salt
  • 1/2 – 3/4 (about 125ml)  cup water

Crust: Either grease your pan with coconut oil or like it with baking paper. Put nuts / seeds in a food processor and mix until coarsely ground. Add the other ingredients and mix until combined. (Add more dates of the dough is to dry and add more nuts if it’s too moist. It’s hard to give exact amounts here cause it all depends on the moisture of your dates!) Put the dough in a baking pan (Ø about 20cm / 8 inch), form the crust.

Filling: Put all the ingredients in a blender and mix! You might want to soak the cashews before blending of your blender is not that strong. Add more water if needed. Pour the cream into the prepared crust. Lick off the spatulas and spoons you used. (This step is essential. DON’T skip ;) ) Put in the refrigerator over night or until the cream firms up.

raw mango cheesecake

Yummy! When a friend taste-tested the cake, he was like “Wow… this is really… cheesy. It’s like cheesecake…”
Even though I’d definitelly not say that this is a one to one cheesecake alternative,… the cashews definitelly yield a cheese flavor. And the mango coconut combo fits the cake really well. Even though I almost had the whole cake for myself, it did not last long until it was gone… hey, I am writing exams. I need brain food! And it seems like the little guy in the pic (no, he was not the test-taster) feels the same about this cake.

raw mango cheesecake

You can freeze the leftovers, too. You might also find the frozen cake easier to cut (even though I had no problems cutting the cake when I left it in the refrigerator over night). Freezing the cake is especial great, when you are making a raw cake for just one or two people. You can eat the frozen cake straight from the fridge… I promise, it’s the best ice-cream cake I ever had!

Caramel Cheesecake – Fairytale come true

17 Sunday Feb 2013

Posted by Playful and Hungry in Playful food and photos

≈ 13 Comments

Tags

baking, banana, cake, caramel, cashews, cheesecake, dessert, food, food photography, healthy, lego, playful, recipes, vegan, vegetarian, vita-mix, whole cane sugar

Sweet times on Playful and Hungry!

I always thought, a cake can’t taste like cheesecake if it’s made from tofu. I was proven wrong. It took some trials and experimenting – but the result was a delicious AND healthy, vegan cheesecake. It’s high in protein and you don’t have to feel bad about eating it for breakfast. Or Dinner. Or lunch…

Piece of cheesecake

It’s might not be 1 : 1 like a sugar-loaded, non vegan cheesecake. But the consistence is perfect and it tastes just as good as any cheesecake I’ve ever tried! Give it a chance!

Using Whole Cane Sugar yields the wonderful caramel flavor! If you want a caramel cheesecake, don’t replace it! If you don’t care so much about the caramel flavor, you could also replace it with stevia or xylit or any other sweetener.

Fariy cheese cake

So… once upon a time, there was a little fairy. And what do fairies do all day? Exactly! They sparkle, twinkle, flutter around and eat cake. Today, it just had to be a cheesecake. Voila.

Fairy plate

So she got out her pink plate…, well, no. She just did some magic and conjured it up.

fairy and cream

Pling! One wink with her wand, and she had a whole plate full of cream…

Time to have some Caramel Cheesecake!

Whole Caramel Cheesecake

Caramel Cheesecake
Inspired by this recipe, Ø about 20cm / 8 inch 

  • 1 package (350-400g) firm tofu
  • 1/2 cup (70g) cashews
  • 1/4 cup (60ml) almond milk
  • 1 tbs vinegar
  • 3 tbs lemon juice
  • 1 ripe banana (can be omitted . use slightly more sweetener) 
  • 6 tbsp soy yogurt
  • 1/4 cup stevia (or more whole cane sugar – which also means more caramel ;) ) 
  • 3/4 cup (100g) Whole Cane Sugar (add more if you like it sweeter!!!) 
  • 1/2 tsp powdered vanilla or 1 tsp vanilla extract

Put all the ingredients in your high speed blender or food processor and mix! Pour into a slightly greased backing pan and bake for about 45 minutes (350 F / 200 C).
Allow the cake to cool down before cutting it!

Oh, by the way… you can be looking forward to a RAW vegan Mango Cheesecake. Just saying… ;)

Fairy on Cheesecake

Greeting from Fairy Land!

Mini Pumpkin Pies – no bake

28 Sunday Oct 2012

Posted by Playful and Hungry in Playful food and photos

≈ 15 Comments

Tags

almond, almonds, cake, cake filling, dessert, food, food photography, Halloween, healthy food, lego, mini pumpkin pies, pie, playful, pumpkin, pumpkin pie, pumpkin pudding, raw, recipes, vegan, vegetarian, vita-mix

Make it small. I like small sized food. Small cookies = more cookies. Small cupcakes = more cupcakes.

Small pies = more pies!!!

And you have a whole pie to yourself… I think that’s great. Plus it’s no bake, so these pies are not only really cute, but also fast and easy to make. Could you ask for anything more?
Oh, and by the way… I think pumpkins are the only reason why fall has a right to exist at all. (You have to know that I don’t really like any season but summer. And yes, I know, I live in a very bad spot concerning my weather preference…).

Come on, they are cute!

The filling is rather a pumpkin pudding, or a pumpkin cream. But it’s one of the most delicious thing I had lately. If you add some corn starch, you could even use this cream as a filling for baked pumpkin pie.

For the crust: It’s raw crust, made from dried fruit, nuts and oats. You could actually use any kind of nut and dried fruits like dates, figs, apricots… I just used what I happened to have in the house. Feel free to use whatever you have on hand!

Mini Pumpkin Pies

  • 100g (1/2 cup) raisins
  • 80g (1/2 cup) almonds
  • 50g (1/2 cup) rolled oats
  • cinnamon
  • 200g (one can) pumpkin puree
  • 3-4 Tbsp Maple Syrup
  • 175g (6 oz or half a package) silken firm tofu
  • additional sweetener to taste
  • 1 tsp cinnamon
  • 1/4 tsp ginger and cardamon
  • dash of salt, nutmeg and cloves

For the crust, combine the raisins, almonds rolled outs and a dash of cinnamon in your food processor (or vita-mix like blender). Press the dough into silicon muffin pans are into tartlet  pans. It should look like this:

For the filling, mix pumpkin puree, tofu, maple syrup and spices in your food processor or blender (I used homemade pumpkin puree, but it won’t make a big difference). Taste test and add more sweetener, if you like.
Fill the pumpkin cream into the crust and you’re ready to enjoy miniature pumpkin pies!

Spider, pink flower, bat. Nothing wrong here!

Trick or treat…

Great, “This is Halloween” is stuck in my head right now! I guess I will have to watch the movie some time soon… eating mini pumpkin pies and thinking of other Halloween food.

Happy Halloween!

Do you go to a Halloween Party and will you dress up?

Black Forest Punk Rock

20 Thursday Sep 2012

Posted by Playful and Hungry in Playful food and photos

≈ 16 Comments

Tags

birthday cake, black forest cake, cake, cake decoration, cake filling, cherry, chocolate, cocoa, cream, dessert, food, food photography, frosting, lego, playful, recipes, vegan, vegetarian

Punk Rock!!!

Black Forest Punk? Why not?
I like to combine what seemingly doesn’t fit together!

Black Forest Cake is a very traditional cake from Germany. A real classic. Something that definitely has to be “veganized”! Yes, many people think that German food and Veganism go as much together as… punk rock and the Black Forest area.
Let me tell you something: They definitelly go together! People didn’t even notice that my cake was vegan. 1 : 0 for vegan cake!

The Germans even have a special word for cream cakes like this: “Torte”. Yes, they love cream cakes. They hardly ever use icing, cream is much more common.

I usually don’t like the combination of fruit and chocolate… with just a few exceptions! This cake is one of them. Oh, it was my Mom’s birthday cake, by the way…

Ring of fire cherries!

Don’t be afraid:
Yes, you do need more then one day to make this cake. But it’s a cake you won’t make every week, so that’s fine! Don’t worry, it’s really easier then you might think!

Black Forest Cake 

Chocolate Cake layers

  • 2 1/2 cups (300g) whole wheat pastry flour (Gemany: Weizenmehl Typ 1050)
  • 6 1/2 tbsp (50g) cocoa powder
  • 1 cup (200g) sugar
  • 2 tsp vanilla extract OR 2 packages vanilla sugar
  • 2 tsp baking powder
  • dash of salt
  • 1/2 cup (120 ml)
  • 1,5 cups (350 ml) water

Short crust

  • 1,5 cups (200g)  whole wheat pastry flour
  • 1/2 cup (100g) margarine (Earth balance or Alsan…)
  • 1/2 cup (100g) sugar
  • about 3 tbsp water (as needed)
  • 1/2 tsp baking soda

Filling

  • 1 glas canned cherries (25 fl oz / 750 ml)
  • just over 2 tsp agar agar
  • 1 tbsp corn starch
  • 2-3 packages soyatoo
  • sweetener to taste

Day 1: Prepare the cake layers and the short crust
Mix all the ingredients for the cake layers in a big bowl. Don’t overmix!
Put the batter in an oiled pan (about 24 cm or 9,5 inches) and bake for about 40 minutes (350 F / 180 C)

Short crust: Mix all the ingredients for the short crust. Press the dough into the buttom of an oiled pan (24 cm or 9,5 inches). Bake for about 25 min (350 F / 180 C)

Day 2: Filling and decoration
Whip the soyatoo and add sweetener to taste. Put the cream in the refrigerator.
Boil the cherries (juice and fruit) with the agar  agar and corn starch for about two minutes (don’t use a microwave!). Let the filling cool down for a little while (it should not be firm yet).
Now you need a cake ring or the ring of a springform pan.
Place the cake ring on a big plate or baking tray. Put the short crust into the ring. This is the button layer. The cake ring should stand loosely around the short crust.
Put some cherry juice on top of the crust and let it cool down. Work slowly and wait until the juice get firm. This layer can be really thin (2-3 mm / 0,1 inch).
Now you can add your first layer of cream (about 1 centimeter / 0,4 inch).
Cut the chocolate cake you made the day before into two halves, using a big and sharp knive, so you have two round cake layers. Put the first cake layer on top of the cream layer.
Now you add the cherries. Place them on top of the chocolate cake layer. You can also add some of the juice if you want. Now there’s another cream layer. Fill in the space within the cherries with the cream. Add the second cake layer. Now your almost done! Cote the cake with the rest of the cream. Decorate the cake with chocolate flakes and 12-14 cherries.
Important: The cake tastes much better if you let it sit in the refrigerator for one night!

In the process: Decorating the cake!

Note: The traditional recipe calls for cherry brandy (“Kirschwasser”) – I just left it out cause I don’t like it… Feel free to sprinkle some cherry brandy on the cake layers if you want to.

This was a birthday cake – I definitelly won’t make cakes like this every day… Also, it was the first big cream layer cake I made – it’s easier than I thought it would be! And so yummy!

A (bad cell phone) picture of the different layers. There was not much time to take pictures of our food at the party and I didn’t want to cut the cake before serving…

Very Berry Vanilla Yogurt Cake

30 Thursday Aug 2012

Posted by Playful and Hungry in Playful food and photos

≈ 16 Comments

Tags

baking, banana, birthday cake, cake, cake decoration, dessert, food, food photography, fruit, healthy, healthy food, lego, recipes, strawberries, strawberry, vegan, yogurt

Finally: The cake from the header. Yes, I know, you had to wait quite a while for this. And some people have asked me about it. Well… here it is!


Don’t worry, he got his peace of the cake!
It was my birthday cake this year. I wanted a summery light and refreshing cake. A cake that doesn’t make you feel yucky after one peace.  As it was summer, it was obvious that there had to be a lot of fruit in this cake!


So, that was all I knew before I made the cake: A lot of fruit, some yogurt and a vanilla cream. Yes, I can work with that. The result: Very Berry Vanilla Yogurt Cake.
Creativity can be so yummy!

Very Berry Vanilla Yogurt Cake

  • 3oog / 1 1/4 cups / 10,5 ounces soy yogurt (I recommend to weight the yogurt)
  • 200g / about 1 1/4 cups / 7 ounces mixed frozen or fresh berries (I recommend to weight it)
  • dry sweetener to taste
  • 2 tsp agar agar powder or 2 tbsp agar agar flakes
  • 1 vanilla pudding mix (like Dr Oetker organic vanilla pudding. For Germany: Ruf Vanilla pudding)
  • 1 cup soy creamer (Germany: Alpro Cuisine) or canned coconut milk
  • 1 cup soy milk
  • 1,5 cups vegan graham cracker crumbs (or any other vegan cookie. “Zwieback” works, too)
  • 3-4 Tsp melted Earth Balance / Alsan

Mix Graham crackers and Earth Balance in a bowl. Use your fingers to press the mixture evenly into the buttom of your plate.
Now prepare the Vanilla Cream: Prepare the Vanilla pudding according to the instructions, but use half a cup of creamer (or coconut milk) and half a cup of soy milk. Pour the pudding on top of the crust and let it cool down in the refrigerator.
Time to prepare the yogurt layer! Blend the mixed berries. Put the blended berries in a pot and boil them up with the agar agar (don’t forget to stir a lot!). Finally, mix the yogurt and the warm berry mixture in a bowl. Add sweetener to taste (you cold either use stevia, xylit, cane or coconut sugar. Don’t use liquid sweetener cause the yogurt might get thick if you do) Pour the yogurt berry mixture in your pan on top of the vanilla cream. Let the cake cool down in the refrigerator (it takes about 6  hours for the agar agar be completely thick. Don’t remove the cake from the pan before completely cooled down.)
Once the cake is firm and cooled down, you can remove it from the pan and decorate it! Be creative! (Remember: Being creative can be really yummy!)

I think my little friends have discovered something in my kitchen…

And here’s a piece of the cake with both it’s layers.

Just to give you an idea what it looked like!
You can use any kind of yogurt and any kind of milk you want. However, I’d recommend to weight the yogurt and the berries. Weighting the ingredients is more exact and will yield to the best results when using agar agar.

Have you ever made a vegan yogurt cake? (Or: Have you ever made a yogurt cake in the first place?) You should! It’s fun and it’s delicious!


← Older posts

Pinterest

Follow Me on Pinterest

Foodgawker

my foodgawker gallery

Recent Posts

  • BRAAAIIIINS! This is vegan Halloween!
  • Brainfood!!! Mango-Energie Bar
  • Mandarine Yogurt Cake – Hell yeah it’s summer!
  • RAW Strawberry Rhubarb Popsicles
  • Review: Sedona and Apple Wrapper recipe

Archives

  • October 2013
  • July 2013
  • June 2013
  • May 2013
  • April 2013
  • March 2013
  • February 2013
  • January 2013
  • December 2012
  • November 2012
  • October 2012
  • September 2012
  • August 2012
  • July 2012

Categories

  • Just playful
  • Playful food and photos
  • Reviews

Enter your email address to follow this blog and receive notifications of new posts by email.

Join 483 other subscribers

Playful and Hungry

Playful and Hungry

Copyright

© Playful and Hungry, 2013. Unauthorized use and/or duplication of this material without express and written permission from this blog’s author and/or owner is strictly prohibited. Excerpts and links may be used, provided that full and clear credit is given to Playful and Hungry with appropriate and specific direction to the original content.

Create a free website or blog at WordPress.com.

Privacy & Cookies: This site uses cookies. By continuing to use this website, you agree to their use.
To find out more, including how to control cookies, see here: Cookie Policy
  • Follow Following
    • Playful and hungry
    • Join 483 other followers
    • Already have a WordPress.com account? Log in now.
    • Playful and hungry
    • Customize
    • Follow Following
    • Sign up
    • Log in
    • Report this content
    • View site in Reader
    • Manage subscriptions
    • Collapse this bar
 

Loading Comments...